

Programming Loops and If-then/for/while Statements
So far we have mainly used R for performing one-line commands on vectors or matrices of data. One of the most powerful features of R is in being able to do programming, without a lot of the low-level detailed bookkeeping issues that one needs to keep track of in other computer programming languages like C, Java, Perl, etc. In this section we will explore some simple, yet powerful, programming tools in R, such as loops, if-then and while statements.
R is an expression language in the sense that its only command type is a function or expression which returns a result. Even an assignment is an expression whose result is the value assigned, and it may be used wherever any expression may be used; in particular multiple assignments are possible. Commands may be grouped together in braces, {expr_1; ...; expr_m}, in which case the value of the group is the result of the last expression in the group evaluated. That is a bit abstract, so let's get our hands dirty.
If/else statements
In R, one can write a conditional statement as follows:
ifelse(condition on data, true value returned, false returned)
The above expression reads: if condition on the data is true, then do the true value assigned; otherwise execute the "false value."
> ifelse(3 > 4, x <- 5, x <- 6)
> x
[1] 6
The operators && and || are often used to denote multiple conditions in an if statement. Whereas &(and) and |(or) apply element-wise to vectors, && and || apply to vectors of length one, and only evaluate their second argument in the sequence if necessary. Thus it is important to remember which logical operator to use in which situation.
> hmean = mean(htwtdata$height)
> wmean = mean(htwtdata$weight)
> ifelse( hmean > 61 && wmean > 120, x <- 5, x <- 6)
> x
[1] 5
> htwt_cat<-ifelse (height>67 | weight>150, "high", "low")
> htwt_cat
[1] "low" "low" "low" "low" "low" "low" "low" "low" "low" "low" "high"
[12] "high" "high" "high" "high"
> htwt_cat<-ifelse (height>67 || weight>150, "high", "low")
> htwt_cat
[1] "low"
(Notice that in the second ifelse statement only the first element in the series was computed.)
This can also be extended to include multiple conditions. Suppose we have the following data:
final_score<- c(39, 51, 60, 65, 72, 78, 79, 83, 85, 85, 87, 89, 91, 95, 96, 97, 100, 100)
passfail<-ifelse(final_score>=60, "pass", "fail")
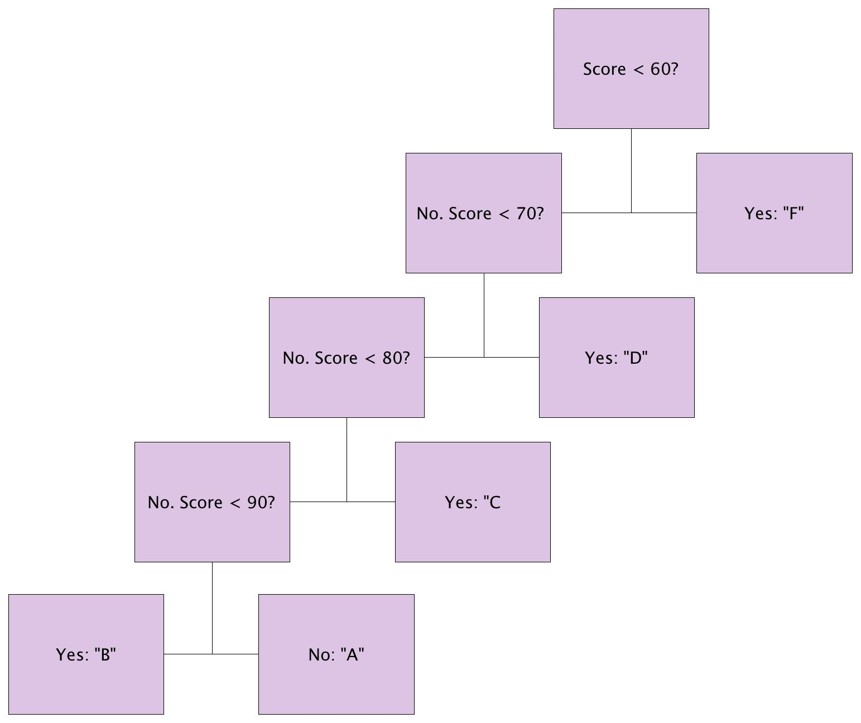
Suppose we want to create a variable called grades that is assigned as follows:
"F" if final_score <60
"D" if 60≤final_score<70
"C" if 70≤final_score<80
"B" if 80≤final_score<90
"A" if 90≤final_score
Nested ifelse Statements
We can use a "nested" ifelse command as follows:
grade<-ifelse(final_score<60,"F", ifelse (final_score<70,"D", ifelse(final_score<80,"C", ifelse (final_score<90,"B", "A"))))
The logic by which this will assign grades is depicted in the figure below.
This type of scheme is really useful for putting different colors in graphs for different conditions. Consider the following graph of air quality measurements taken hourly in Beijing.
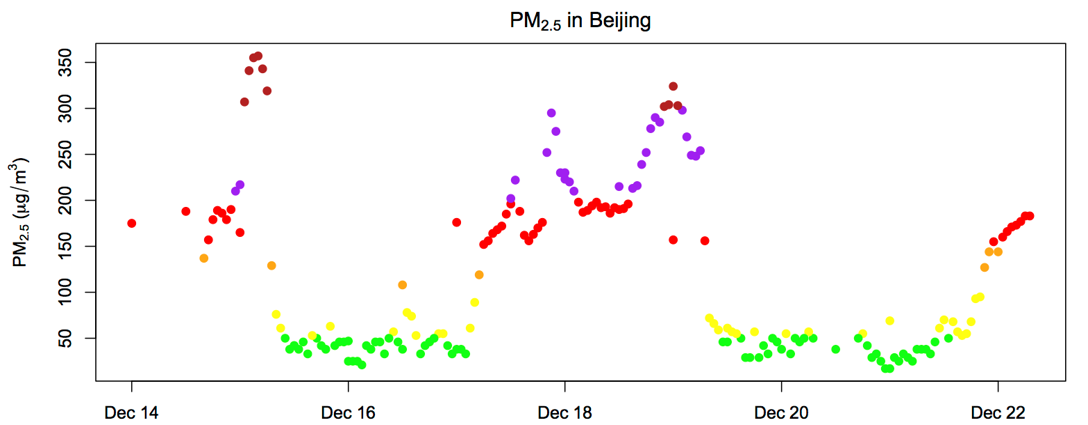
The code for the color section of the graph in the plot() command reads:
col = ifelse(pm25<=50,"green",
ifelse(pm25<101,"yellow",
ifelse(pm25<150,"orange",
ifelse(pm25<201,"red",
ifelse(pm25<301,"purple",
"firebrick")
)
)
)
)
