


Inside the Online Meeting on a PC
When you first enter the SfB meeting you have created, you will see a fairly empty screen, as shown here.

However, you can begin setting up the meeting and creating usable content by using:
- The options in the Participants window on the left
- The four icons at the lower center of the screen
- The two icons at the lower right.
The Participants and Instant Messaging Window
The space on the left will list the meeting "PARTICIPANTS" at the top. Note that the two middle icons to the right of my name indicate the status of my microphone (muted or not) and my web cam (on or off). These icons will appear next to each of the participants who enter the meeting, and you (as the host) can control their microphone and web cam privileges by clicking on the icons next to their name.
Under "PARTICIPANTS" you can also
Invite others and control participant actions using these buttons:

The "Invite More People" option takes you to the contacts section of SfB.
The "Participant Actions" button gives you the screen shown below, which allows you to mute/unmute the entire audience, turn off/on the IM (instant messaging), turn off/on the web cams of the participants, hide the names of the participants, or invite participants by email.

The lower section, labeled, "CONVERSATION" is the instant messaging (IM) window which allows you and the participants to type in text messages. If you want to send a text message to the participants, you would enter it into the lowermost part of the window and hit "Enter" to submit it.
In the meeting presentation window with the black background there are four central icons and two additional icons at the lower right.
Lower Right Icons on PC
There are two icons at the lower right.
- The phone icon on the left is largely irrelevant for us since it controls dial in options for audio. Most of us will be using Voice Over IP (Internet audio via the computer or tablet).

- The three dots icon (...)on the far right is for "More Options/" If you click on this, you will see the following options:

- Start Recording - Turns recording on and creates a message on the screen alerting users that the session is being recorded. It is probably a good idea to also announce that the session is being recorded. To STOP recording, click on the "More Options" icon again, and the first option will now be "Stop Recording."
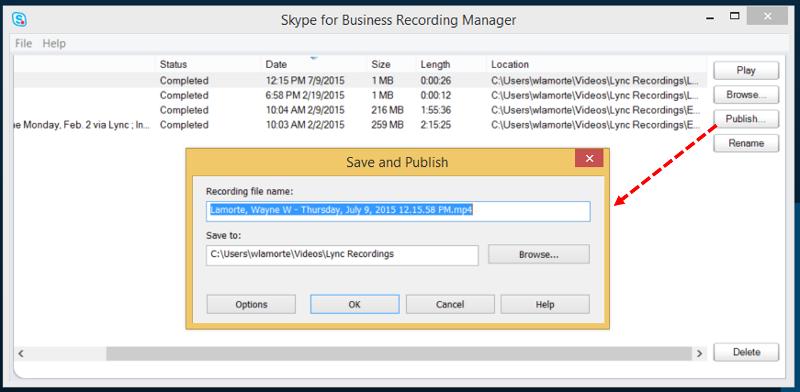
- Manage Recordings - Gives you access to recordings that have been saved. When you initiate recording, the video is saved on your local computer as an .mp4 file. The recording manager allows you to play recordings, browse the folder where your recordings are stored, publish recordings (i.e., save them to another location, rename recordings, or delete them. The image below shows the screen that appears when you click on "Manage Recordings" and then on "Publish." You can see exactly where the files are stored on your local machine.
- IM Text Display Size - Self-explanatory.
- Change Font - Self-explanatory.
- Meeting Entry Information - This just gives the URL address for the meeting.
- Skype Meeting Options - This opens the window shown below.

- End Meeting - Self-explanatory.
- Skype for Business Help - Self-explanatory.
The Four Central Control Icons

- The first icon on the left allows you to turn your web cam (if you have one) on and off.
- The second icon allows you to mute (or unmute) your microphone. If your microphone is muted, there will be a diagonal line across the icon.
- The third icon is the presentations icon, which provides a number of presentation options that will be described in detail on the next page.
- The red phone icon allows you to hang up and exit the meeting.