
Skype for Business (Lync)
For Online Meetings
Contributing Authors:
Wayne LaMorte
Kenith Wilson
Liam Hunt
Jana Mulkern
Sean Kinnean
NOTE: This module focuses on the installation and use of Skype for Business (aka Lync), which are synonymous. Lync was the name of the original product, but the name changed in 2015. Some Boston University support information may still refer to Lync, but these are identical. Note also that Skype for Business is NOT the same as the free version of Skype for home. The free version of Skype is good for personal use, but has many limitations compared to Skype for Business. Skype for Business lets you host up to 250 people in online meetings, and it provides a more secure online environment.
This module will refer to Skype for Business (Lync) as "SfB".
SfB is quite versatile and easy to use. This module is designed to walk you through installation and use. While the explanations and illustrations are fairly detailed, most users will find SfB to be fairly intuitive and user-friendly.
SfB and similar software packages (e.g., Adobe Connect) have a number of potential uses for collaboration and teaching:
To create online meetings an instructor or staff member must have the SfB "client" installed on their computer or laptop. Faculty and staff may install the client at no charge as described below.
Note: Instructions for downloading and installing the software are on page 2.
(These requirements do not apply to guests, just to the hosting faculty and staff.)
Link to PC client software support details
(These requirements do not apply to guests, just to the hosting faculty and staff.)
Link to Mac OS detailed requirements
Note: To verify that your computer meets these minimum requirements, on the Apple menu, click About This Mac.
See Link to Microsoft's mobile clients requirements pages or specific device/client downloads for current information

Note: Many BU faculty and staff already have Lync installed on their BU-owned PCs .
Go to Link to http://www.bu.edu/office365
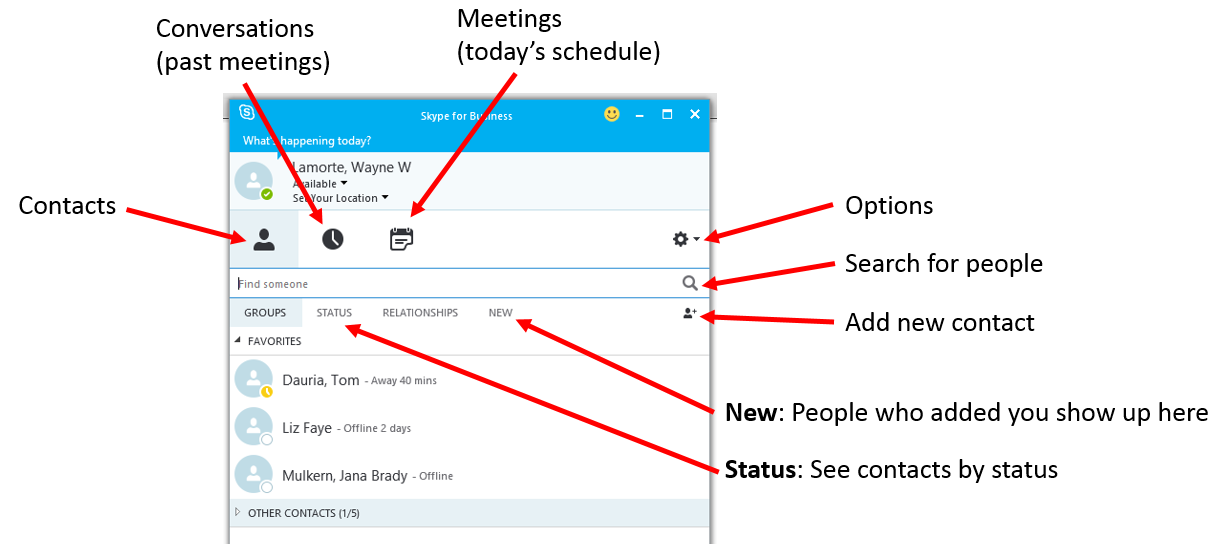
When you open SfB, you should see the window below. Note that there are icons for contacts, conversations, and meetings (your daily schedule). In the image below the "contacts" and "GROUPS" tabs have been selected, as indicated by the light blue shading.
The most important items on the options menu are the "Meet Now", "Tools", and "Help" functions. Note that the "Tools" submenu has selections for
The video below illustrates the controls on the initial window that opens when you start SfB.
Link to a transcript of the video
If you are using Microsoft Outlook for email, contacts, and your calendar, SfB can integrate entries from Outlook quite easily. For example, the "Meeting" icon will show you the entries in your Outlook calendar for the current day.
Suppose you want to add someone on Boston University's Global Address List to your contacts list in SfB. If you have selected the "Contacts" icon (the head and shoulders silhouette), you will see two categories:
The search box in the SfB Contacts screen says "Find someone." Type the name of someone in the BU directory into the box, then right-click on the person you want to add, and select either "Add to Favorites" or "Add to contacts," which will give you the option to add them to "Other Contacts."
By default SfB creates two groups: "Favorites" and "Other Contacts". However, you can create and define your own groups. Suppose, for example, that I wanted to create a group that consisted of all of the students in my EP713 class.
From the Contacts screen in SfB, I would click on "Groups" and then click on the "add" icon on the right. This will produce the following:
I would select the "Create a New Group" option and then procede to add the individual students to that group.
That at the lower left corner of the SfB window there is a small icon with a blue monitor and black speaker. If you click the chevron to the right of the icon, the menu below will pop down, although the By may be different depending on your computer's available audio devices.
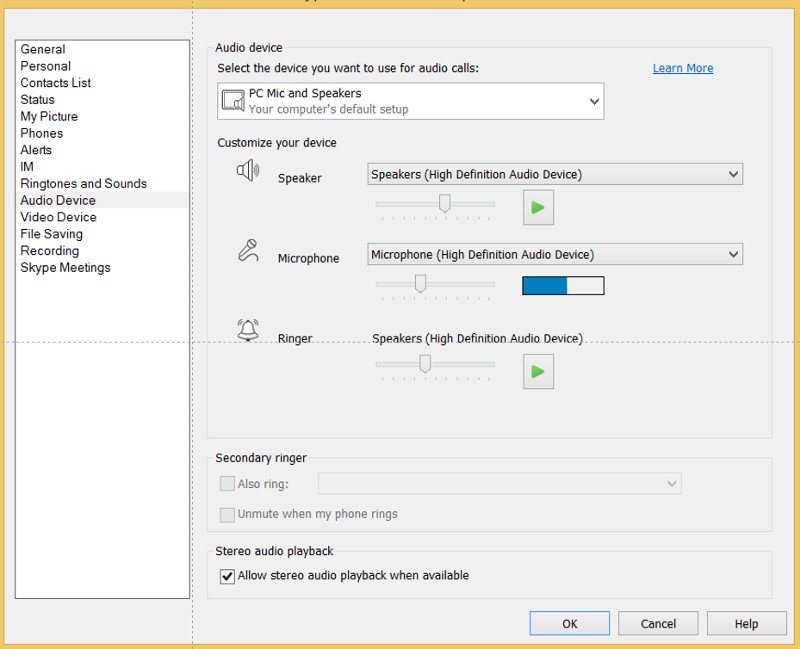
If you select "Audio Device Settings, you will see the screen below, which defaults to showing the "Audio Device", i.e., the microphone that is selected. If your microphone is functioning, you should see an indication of the volume from the width of the horizontal blue bar that appears when you speak into the microphone. There are other options that can be accessed from the menu on the left, but it is very unlikely that you will need to change any of these settings.
 ,
,
The brief Microsoft video below (1:44) shows how to test and make changes to your audio and video devices.
There are two ways to begin/create a meeting.
Option 1 - The "Meet Now" Option
If SfB is open to first screen (shown below), you can click on the chevron just to the right of the gear icon on the right side of the screen. This will open the small options window shown below. (NOTE: If you click on the gear itself, you will get entirely different window with a variety of other options.)
Selecting "Meet Now." will initiate a meeting and bring you to another window called "Join Meeting Audio." This will present audio choices, and the default is "Use SfB (full audio and video experience). Leave this default selected, and click "Ok".
Option 2 - Creating a Meeting from Your Outlook Calendar
You can create a SfB meeting from your Outlook calendar. The calendar screen will have a button labeled "New SfB Meeting" in the tool bar at the top.
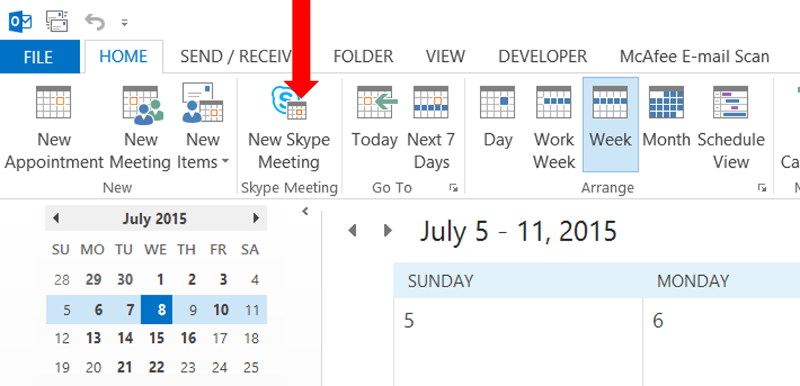
This option will enable you the create a new SfB meeting. In the example below, I am creating an online class meeting because of an impending snow storm.
You can invite others to the meeting as you create the invitation, and the invitees would receive invitations in their email, with an option to accept the invitation or not. In this example, I am just sending the invitation to myself, because there is an easier way to invite all 85 students in my class. Once I "Send" this, it will save the meeting information in my Outlook calendar.
If I open the scheduled meeting in my Outlook calendar, this is what I will see.
The brief Microsoft video below (1:49) will provide more detailed information about using Outlook to schedule a meeting.
Regardless of which option you use for initiating or scheduling a meeting, SfB creates a specific URL address for a given meeting.
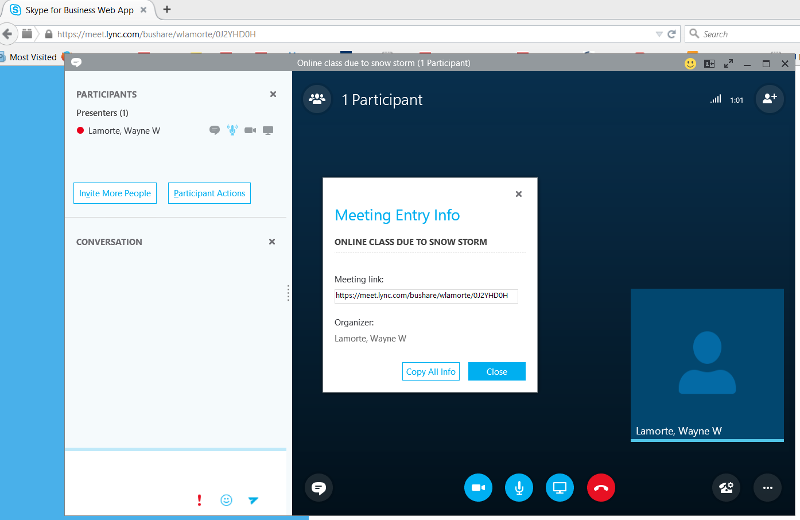
In this example, the URL that SfB created for this meeting is https://meet.lync.com/bushare/wlamorte/0J2YHD0H (This is not an active link.)
Once I have the meeting URL, the easiest way to invite a large number of student is to send the URL to them via Blackboard's email function, and the URL and instructions can also be posted on Blackboard.
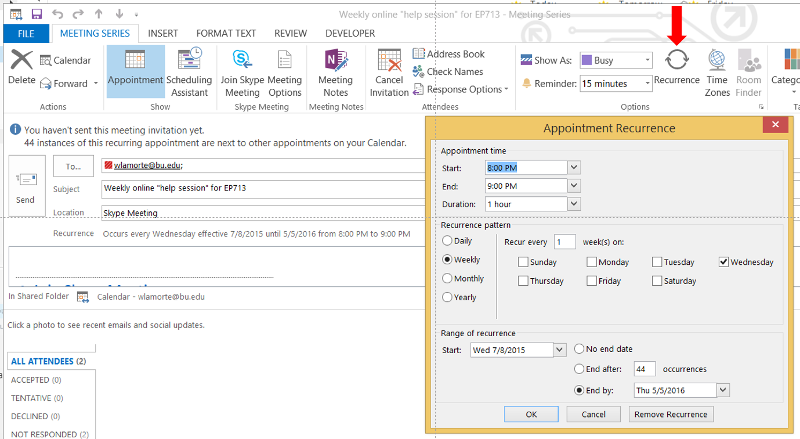
Suppose that instead of creating a one-time meeting, I want to hold an online "Help Session" for my EP713 course every Wednesday evening from 8:00-9:00 PM. When I create this meeting in the Outlook calendar, I can use the "Recurrence" option to create a recurring meeting.
To create the recurring meeting go to the Outlook calendar and click on "New Skype Meeting" as before, and indicate the subject. Then click on the "Recurrence" option (see red arrow below) to get the "Appointment Recurrence" window. Note that in the example below I have indicated that the meeting will occur every Wednesday evening from 8:00-9:00 until May 5.
I would then click "Send," and the meeting will be entered in my calendar every Wednesday until May 5.
A key advantage to this is that once a recurring meeting is scheduled, the URL for the meeting remains the same until the series of meetings is completed. This means that I can get the meeting URL as described above and then send it to my students or post it on Blackboard, and they can go to the same URL address every week.
When you first enter the SfB meeting you have created, you will see a fairly empty screen, as shown here.
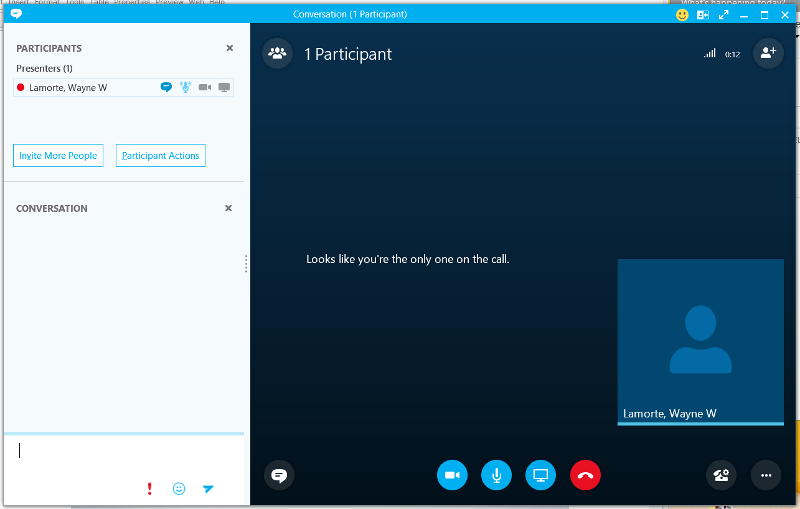
However, you can begin setting up the meeting and creating usable content by using:
The space on the left will list the meeting "PARTICIPANTS" at the top. Note that the two middle icons to the right of my name indicate the status of my microphone (muted or not) and my web cam (on or off). These icons will appear next to each of the participants who enter the meeting, and you (as the host) can control their microphone and web cam privileges by clicking on the icons next to their name.
Under "PARTICIPANTS" you can also
Invite others and control participant actions using these buttons:
The "Invite More People" option takes you to the contacts section of SfB.
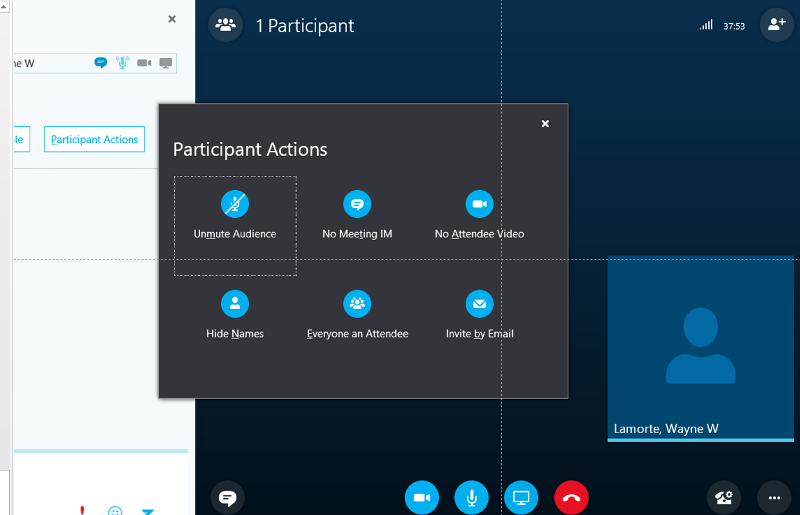
The "Participant Actions" button gives you the screen shown below, which allows you to mute/unmute the entire audience, turn off/on the IM (instant messaging), turn off/on the web cams of the participants, hide the names of the participants, or invite participants by email.
The lower section, labeled, "CONVERSATION" is the instant messaging (IM) window which allows you and the participants to type in text messages. If you want to send a text message to the participants, you would enter it into the lowermost part of the window and hit "Enter" to submit it.
In the meeting presentation window with the black background there are four central icons and two additional icons at the lower right.
There are two icons at the lower right.
or icon to the left of the red phone, you will be presented with the following options:
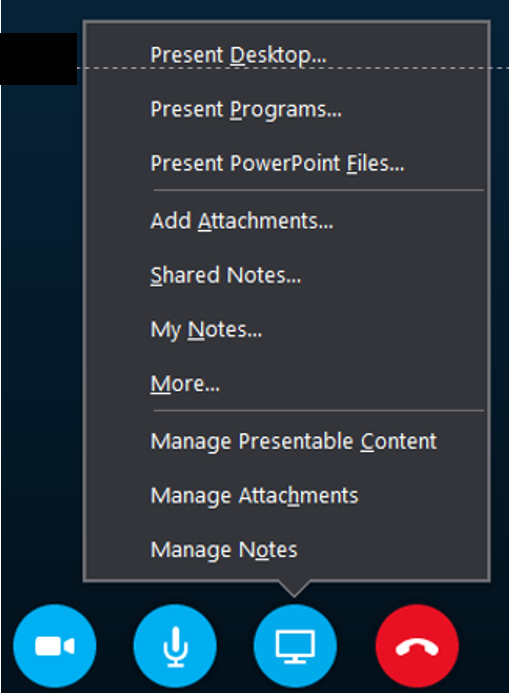
The "Notes" options are only relevant if you are using OneNote, and these will not be described here. However, several of the other presentation options merit discussion.
|
SfB/Lync meets Boston University's security requirements for Public, Sensitive and Confidential Information, but does not meet the requirements for Restricted Use data. If you routinely handle Restricted Use data such as Credit Card numbers, Social Security numbers, Financial Account numbers for external financial institutions, Protected Health Information (PHI) or HIPAA data, you must be careful not to share this information over SfB/Lync.
|
When you click "Create," SfB activates the poll question as shown below. There does not seem to be an option for saving a series of poll questions beforehand as you can do in Adobe Connect. Consequently, the polling option seems to have very limited usefulness for an online class.
(Drawing Options on the Whiteboard and in PowerPoint on a PC}
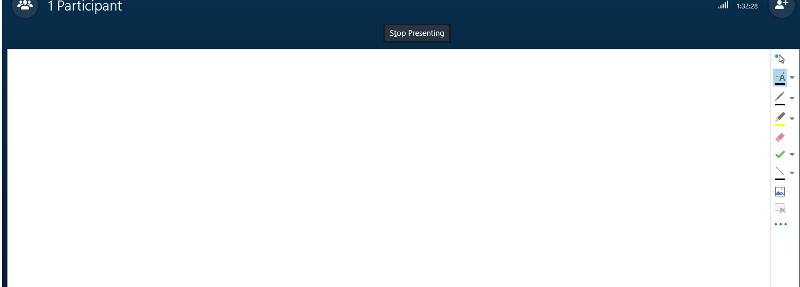
The PowerPoint presentation option and the whiteboard option provide access to a drawing and presentation tools via a menu of vertical icon on the right side of the screen. For example, the PowerPoint screen looks like this:
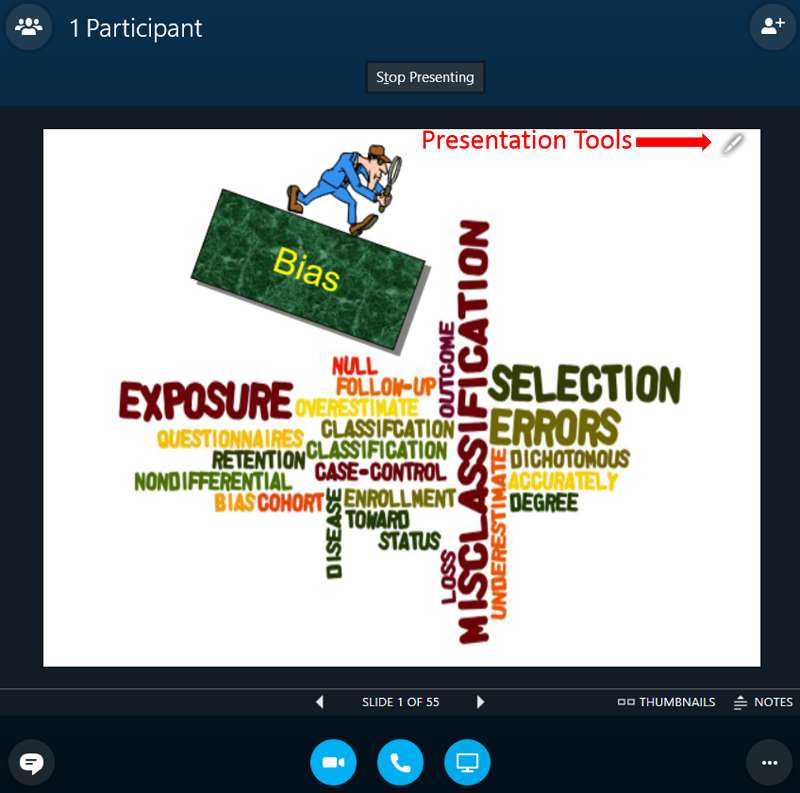
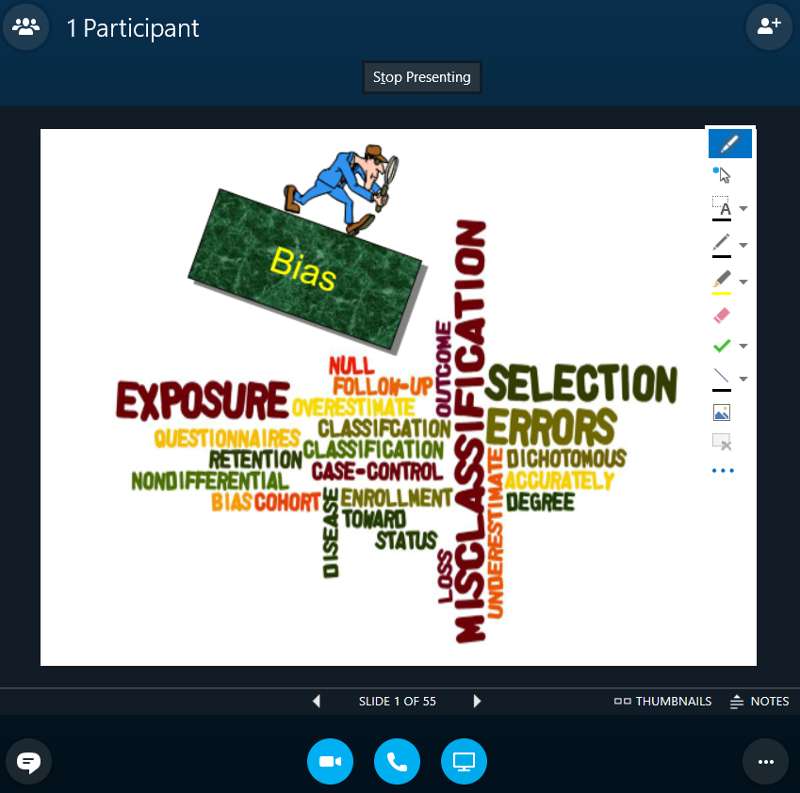
Clicking on the presentation tools icon produces the drawing options shown in the image below.
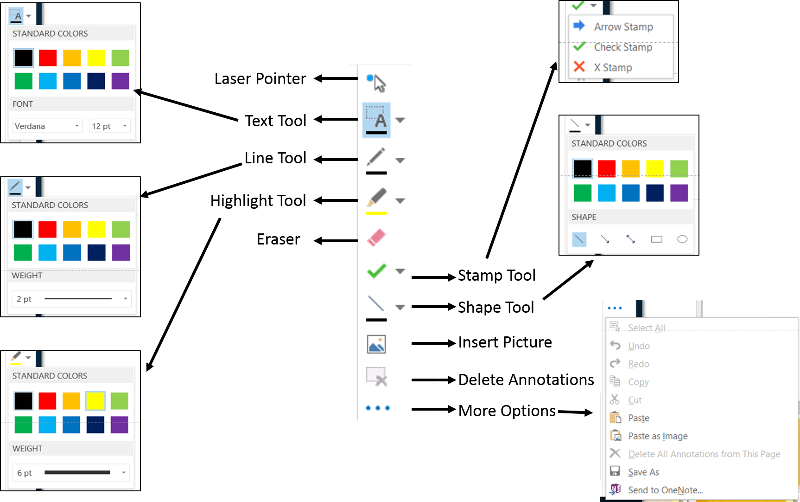
The drawing and presentation options are explained in the image below, which also shows inserts of the options available for some of the drawing tools. If you just practice with these a bit, you will get the hang of it quickly,
The video below shows how to use the annotation and presentation tools in the whiteboard and PowerPoint.
Note that all participants may also use annotation tools.
System Requirements:
Mac client: requires Mac OS X v10.5.8 (Leopard) or later; Note: To verify that your computer meets these minimum requirements, on the Apple menu, click About This Mac
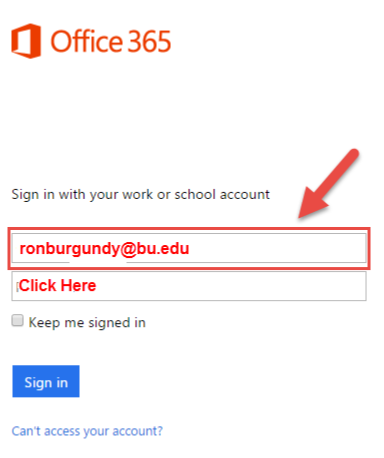
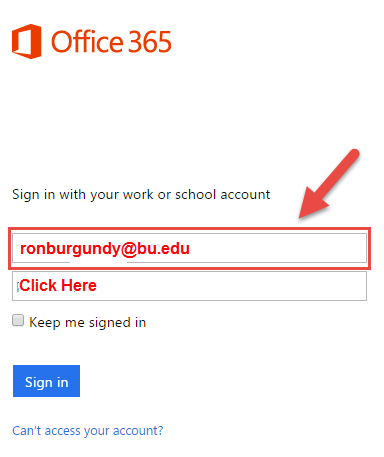
1. Go to Link to http://www.bu.edu/office365
2. Enter your BU user name (login name) and click in the password space. You won't be able to add password at this screen.
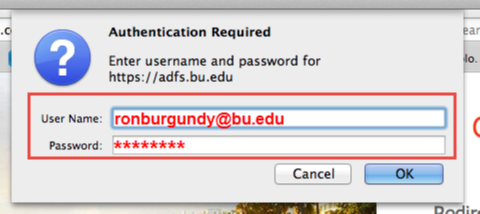
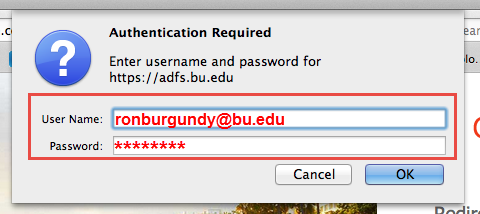
3. At the next screen enter your BU user name and your Kerberos password
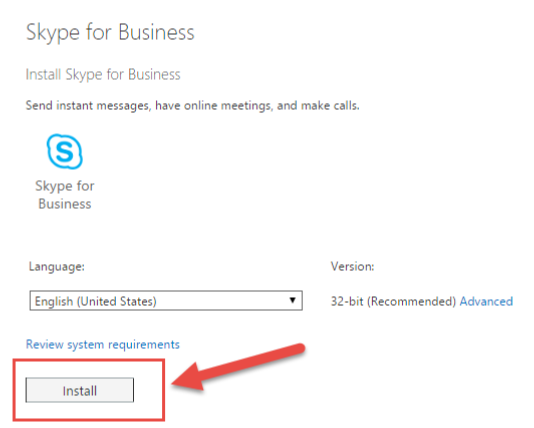
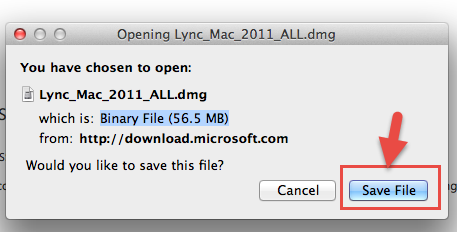
4. Click download.

5. Save the file.
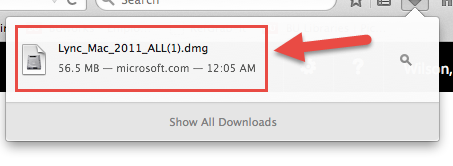
6. Go to your downloads.
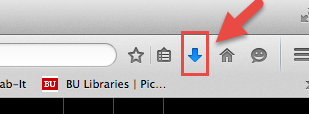
7. Click on the file to downloaded it.
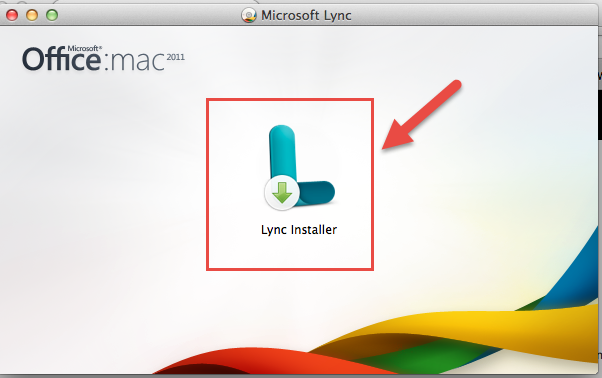
8. Click on the download installer.
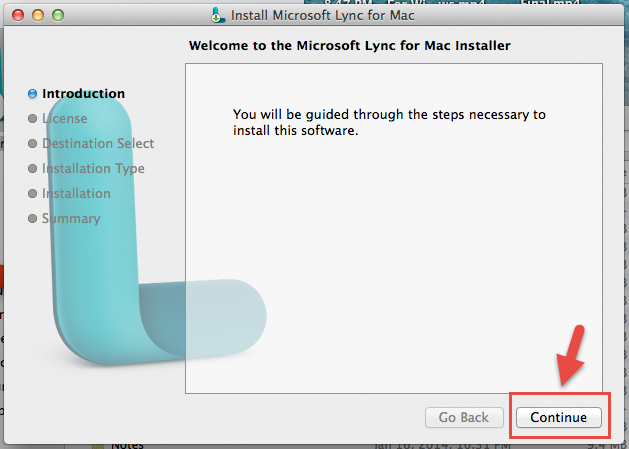
9. Follow the instructions.
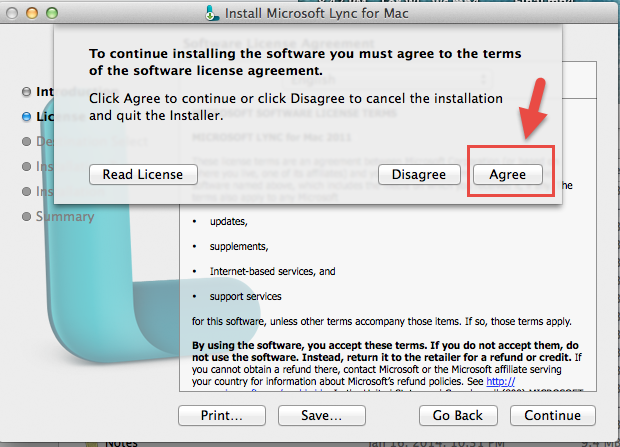
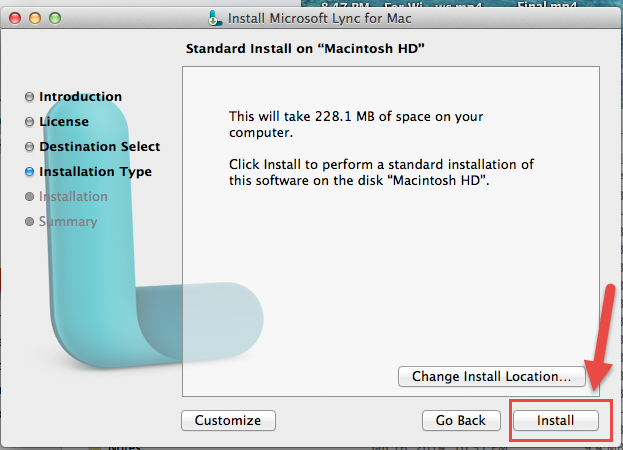
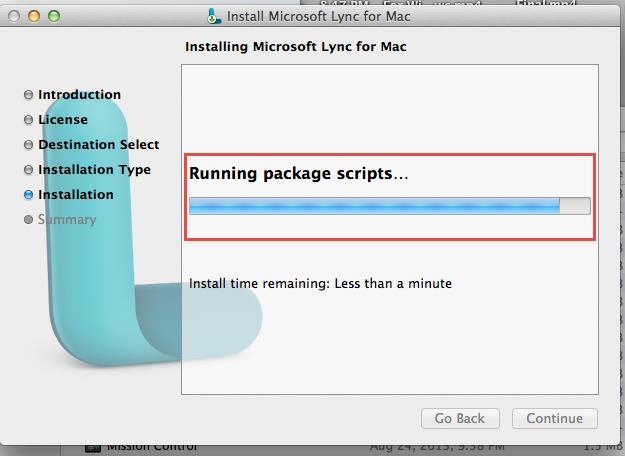
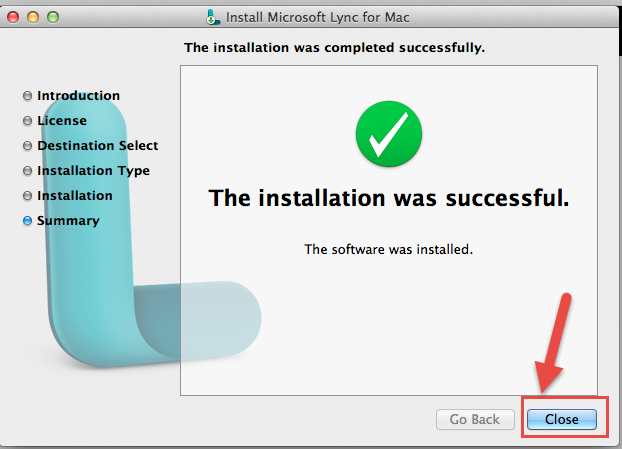
10. Lync is ready to use. You can close this box.
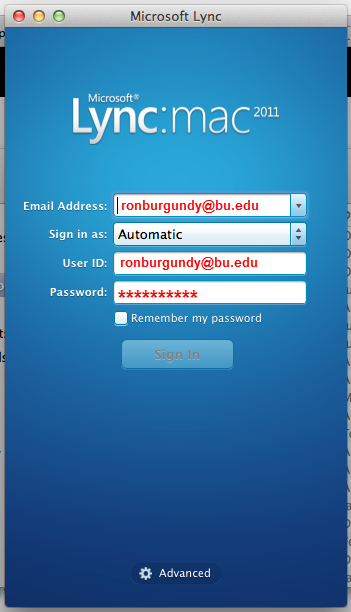
11. Log in with your BU username and Kerberos password.
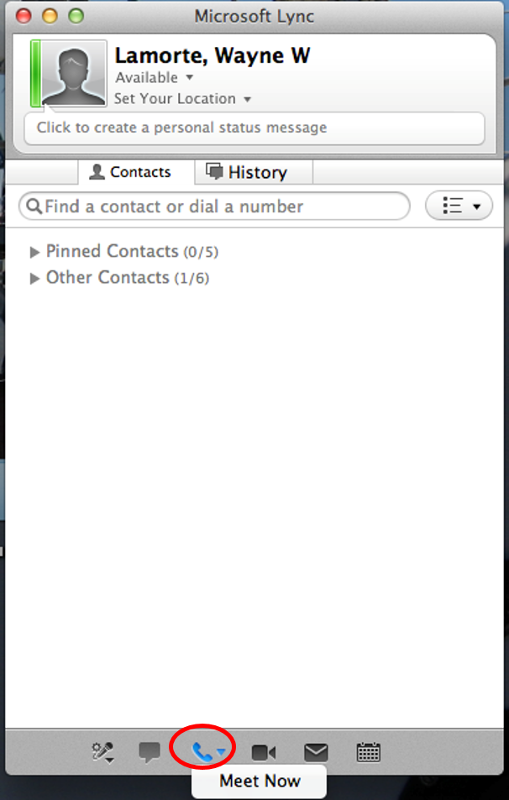
Lync for Mac is much more limited in its capabilities compared to SfB/Lync on a PC, but still can be an effective teaching/meeting tool. When you open Lync for Mac, you should briefly see the blue sign in window at the bottom of the previous module page, and then it should automatically open the contacts window shown below.
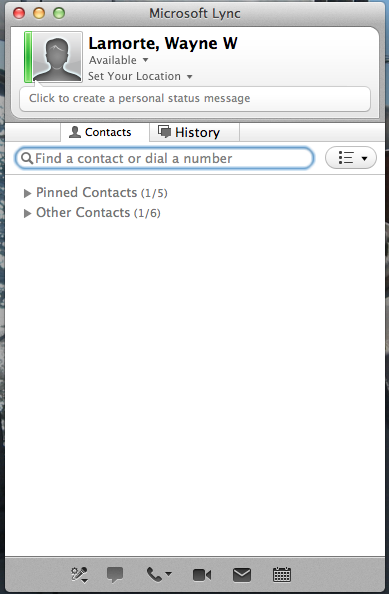
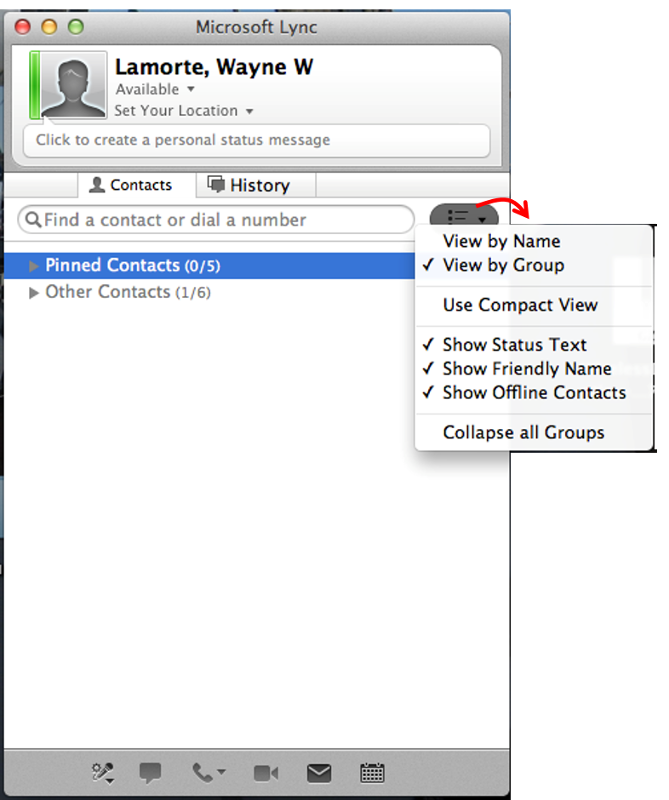
"Pinned Contacts" refers to "Favorites". If you click the chevron to the right of the search box, you will be presented with the options shown below.
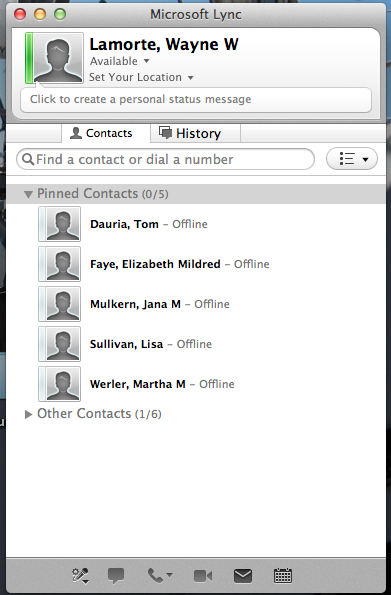
If I expand the "Pinned Contacts" line, I would see the following entries.
The bottom of this window also present some options, show below.
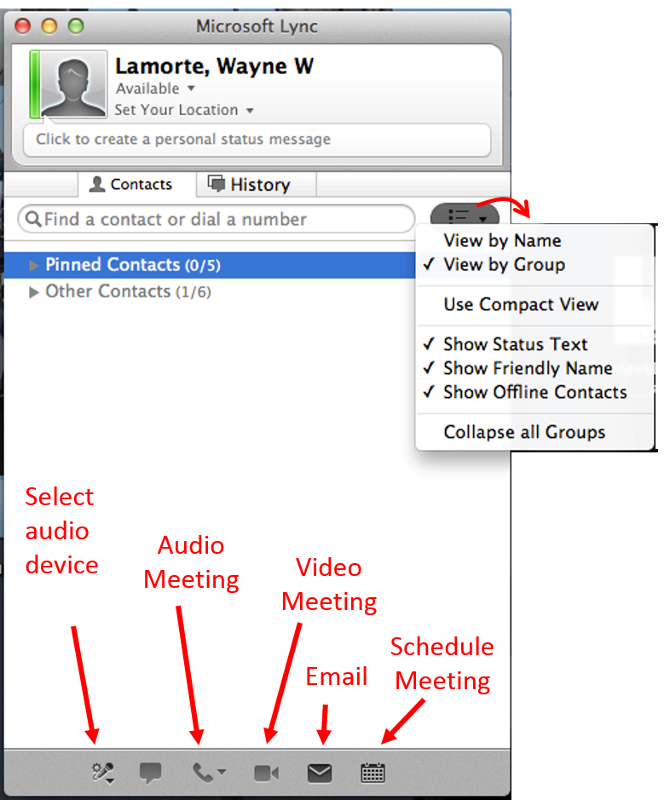
You can initiate an audio only meeting as shown below by clicking on the phone icon and selecting "Meet Now." Alternatively, you could select the video camera icon to initiate a meeting with both your audio device (microphone) and video (your web cam).
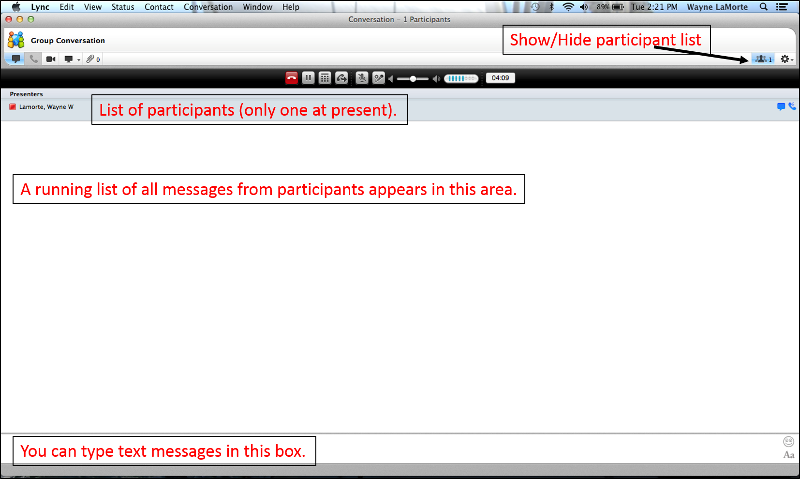
After opening an audio meeting, you would see the window below. There is only one participant in this meeting, but if there were more, they would be listed beneath the meeting host. There is an option to toggle the participant list on and off. Beneath the participant list is the message area, which shows a running list of all messages sent by participants. At the bottom is another box in which you can compose text messages; when you press the "Enter" key, your message will be displayed in the message area.
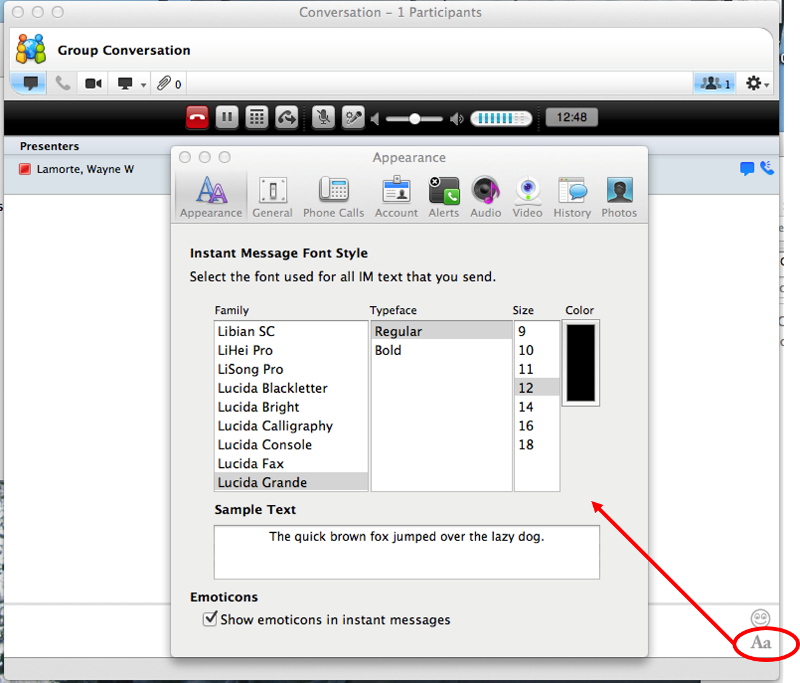
In the lower right corner of the meeting window there is an "Aa" icon that will open a window that gives a number of "Appearance" options for text.
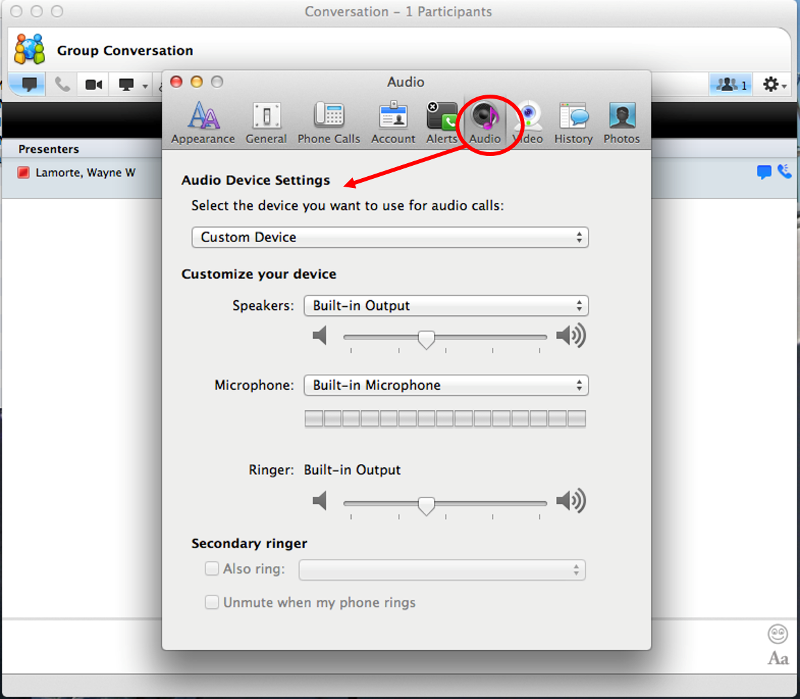
If you select the "Audio" option from the Appearance window, it will open the Audio Device Settings Window shown below. From this window you can test and adjust the volume of the microphone you are using.
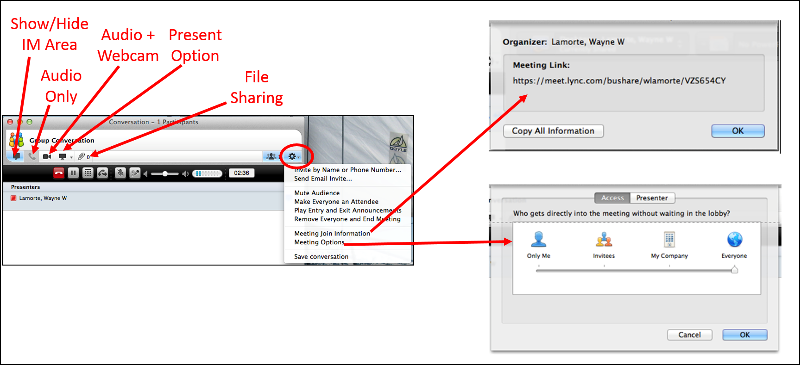
The image below illustrates a number of control options in the meeting window. At the upper right there is a "Participants" icon, which allows you to show or hide the participant list, and to the right of that is the gear icon which opens a window with additional options as shown. Note that this provides a means of getting the meeting URL address, and it also allows you to control admission to the meeting. In general, it is best to use the default option, which is to allow invited participants into the meeting immediately.
In the upper left corner there are several icons. On the far left is an icon that enables you to show or hide the instant messaging area (IM). To the right of that are the phone and video icons that enable you to toggle back and forth between audio only (no web cam) and audio plus web cam. The next icon to the right is the monitor icon that will enable you to present visual material by sharing your screen. Finally, there is a "file sharing" icon that enables you to attach files that participants are able to download.
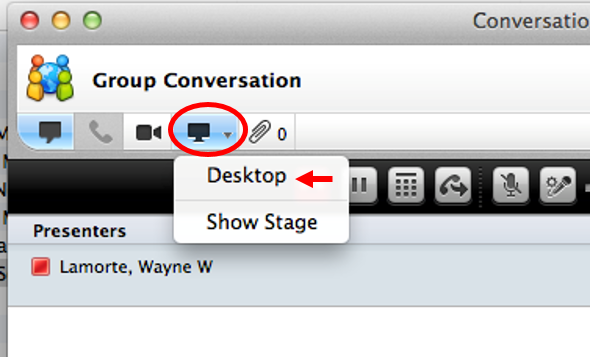
If you click on the monitor icon, you are presented with only two options: share your desktop and "Show Stage." If you are presenting, select "Desktop." If someone else is sharing their desktop, select "Show Stage."
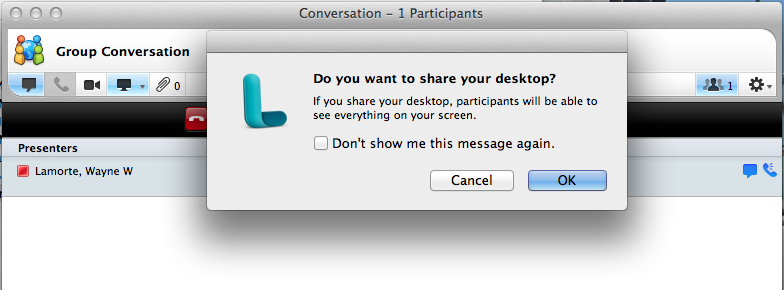
If you elect to share your desktop, you will receive this warning.
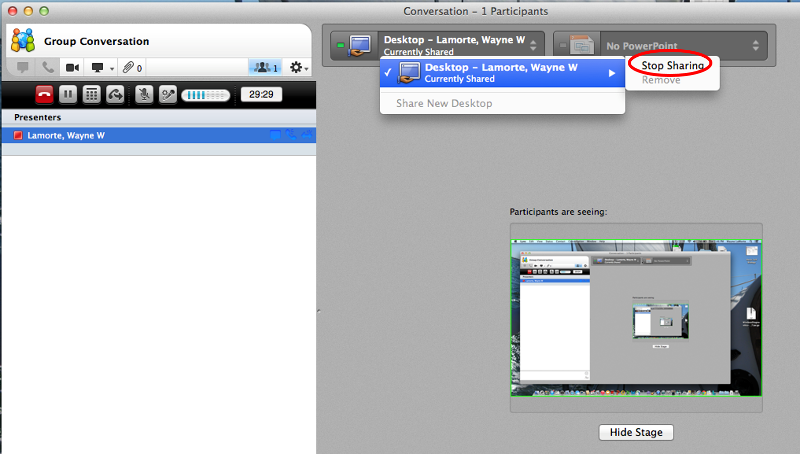
When you want to stop sharing, click on the "Desktop" window and then on "Stop Sharing."
To exit the meeting you can close the Lync window or click on the red phone icon at the upper left.
Teaching online can be effective, but technical problems on either the instructor's end or the students' end can be extremely frustrating. Here are a few things you should do before you teach a class online.
Can I join a SfB meeting even if I don't have SfB software installed?
Yes, but you will have to join the meeting as a guest.
In order to join a meeting you will have to have received either
Please enter your full name, and click "Join the meeting".
The key controls you will use are at the lower left on your screen. Note that if you hover over the icons at the lower left with your mouse, you will see the underlying options.
Five Icons at the Lower Left
Starting from the far left:
The rightmost button at the lower left is the "participants" This enables you to turn the window with the list of participants on and off.
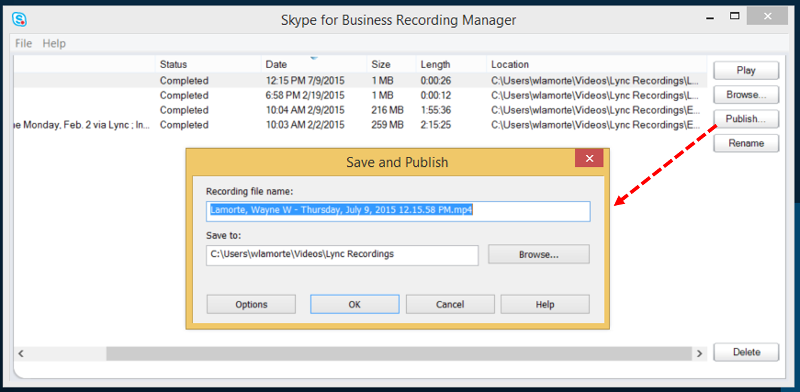
You should be able to record the presentation to your local computer, but remind the presenter to record and post the recording of the meeting.